
Hey Community Learners! My name is Bojan Ivanovski, and I am a Microsoft Learn Student Ambassador & contributor to the Microsoft Zero to Hero Community, with an enormous passion for cloud computing & DevOps.
Over the past year, I have gained experience in deploying web applications to Azure using various CI/CD tools, including GitHub Actions. My journey in this field has been both challenging and rewarding, and I am excited to share my knowledge and insights with you.
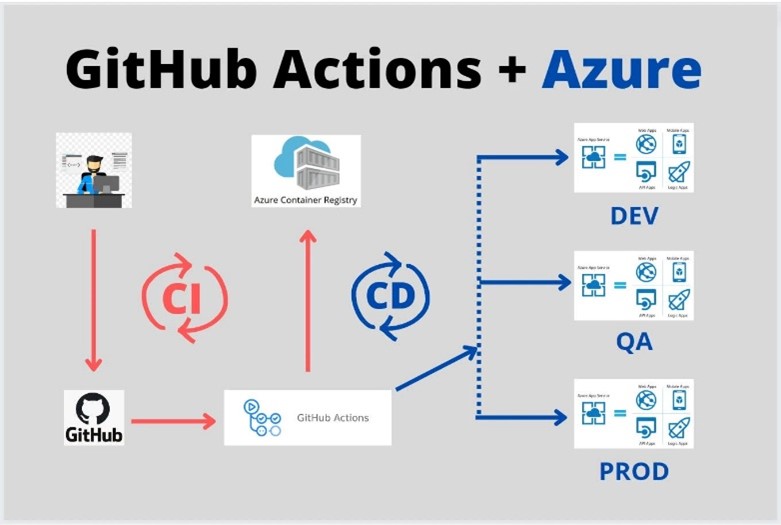
In this blog post, I will guide you through the process of setting up CI/CD pipelines to deploy web apps to Azure, using GitHub Actions as our primary tool.
Brief Introduction to Azure
![]()
Azure is the cloud computing platform for Microsoft, a renowned and powerful tool that broadens the range of cloud services, including compute, analytics, storage, networking, development, IoT, DevOps and even AI. Azure also offers four different forms of cloud computing: infrastructure as a service (IaaS), platform as a service (PaaS), software as a service (SaaS) and serverless functions.
An interesting fact that makes Azure famous is that it runs virtual machines or containers in the cloud. Furthermore, it provides the users with a lot of Azure services which can be used to bring solutions to life, i.e. to solve their challenges and create unique applications.
If you are a student or a beginner in the Azure workspace, you can receive a 150-200 $ subscription to try out Azure and see if it is the right fit for you. Simply, with just a few clicks everyone can build, run, and manage applications on the cloud with various tools and frameworks of your choice.
Introduction to CI/CD & GitHub Actions
CI/CD stands for continuous integration and continuous delivery/deployment, and it is a process that aims to streamline and accelerate the software development lifecycle. This automation means that you can release new features and fixes faster and more frequently, enhancing the product’s responsiveness to user needs.
But where exactly does GitHub Actions come into play? It is very simple. GitHub Actions is also a CI/CD platform, but it is powered by GitHub and all its tools. When we start to learn and use GitHub Actions, there is a very important thing that we should know about. That thing is called a workflow.
The workflow helps us automate all the processes from building to deploying the app on the cloud. It is a configurable automated process that will run one or more jobs. Workflows are defined by a YAML file checked in to your repository and will run when triggered by an event in your repository (change of a line in your code, updating dependencies…), or they can be triggered manually, or at a defined schedule.
In simple words, after you run the git push command in your favorite Code editor or IDE, the changes will be automatically applied to your app hosted on Azure.
Utilizing Azure + GitHub Actions for deployment
For this to be compact and easy to understand, I would like to make this guide into a step-by-step process.
Step 1: Writing your code in your favorite Code Editor or IDE
To start, choose your favorite programming language and open your preferred code editor or IDE. You can follow along with any language or framework you are comfortable with.
Then, you can set up version control, by initializing a Git repository in your project directory. Here you commit your code.
Step 2: Setting Up a GitHub Repository
- git init
- git add .
- git commit -m “Initial commit”
You can create a new GitHub repository or if you have already created one for your project then you can use that one too. We run the following commands to set up our repository properly and push our code from the local repository to the remote one.
- git remote add origin https://github.com/yourusername/your-repo-name.git
- git branch -M main
- git push -u origin main
Step 3: Configuring Azure Deployment Center
With your code in GitHub, the next step is to set up the Deployment Center in Azure to automate the deployment process.
-
- Create an Azure Web App
-
- Log in to the Azure Portal.
-
- Click “Create a resource” and select “Web App”.
-
- Fill in the required details (e.g., Subscription, Resource Group, Name, Runtime stack).
-
- Click “Review + create” and then “Create”.
-
- Create an Azure Web App
-
- Set Up Deployment Center
-
- Navigate to your Web App in the Azure Portal.
-
- In the left-hand menu, select “Deployment Center”.
-
- Under “Source”, select “GitHub”.
-
- Sign in to your GitHub account and authorize Azure to access your repositories.
-
- Select your GitHub organization, repository, and branch (e.g., main).
-
- Set Up Deployment Center
-
- Configure Build Provider
-
- Choose “GitHub Actions” as the build provider.
-
- Azure will automatically generate a GitHub Actions workflow file for you.
-
- Configure Build Provider
-
- Review and Save
-
- Review the configuration and click “Save”.
-
- Azure will set up the deployment pipeline and create the necessary GitHub Actions workflow file in your repository.
-
- Review and Save
Step 4: Triggering the Deployment
Now that everything is set up, you can trigger the deployment by pushing changes to your GitHub repository.
-
- Make a Code Change
-
- Make a change to your code anywhere that you like.
-
- Make a Code Change
-
- Commit and Push the Change
-
- Commit and push the change to your GitHub repository.
-
- Commit and Push the Change
-
- Monitor the Workflow
-
- Go to the “Actions” tab in your GitHub repository.
-
- You should see your workflow running. Monitor the progress to ensure it is completed successfully.
-
- Monitor the Workflow
Step 5: Grand Final
By following these steps, you’ve successfully set up a CI/CD pipeline using GitHub Actions and Azure Deployment Center to deploy a web application to Azure. This powerful combination streamlines the deployment process, allowing you to focus more on development and less on manual deployment tasks.
Conclusion
Leveraging Azure in conjunction with CI/CD pipelines powered by GitHub Actions offers a seamless and efficient approach to deploying applications. By automating the deployment process, developers can save time, reduce errors, and ensure consistent deployments across different environments. Azure provides a robust platform for hosting applications, while GitHub Actions simplifies the automation of build, test, and deployment tasks.
With the power of Azure and CI/CD pipelines, we can accelerate their development cycles, iterate more quickly, and deliver high-quality software to their users with confidence. Whether you’re deploying web applications, APIs, or microservices, Azure and GitHub Actions provide a scalable and reliable solution for modern software development workflows.
I really hope that this beginner-friendly guide has made it a breeze for you to launch your web app in the cloud. Happy deploying!